Sunday, November 18, 2012

Make Your Own Glass Cleaner

Once I made laundry detergent and realized how easy it was to do and how much money it saved, I wanted to make more of my own cleaners. Making your own household cleaner(s) is easy to do, saves you money, (most ingredients you probably already have in your home), and helps you control -- or eliminate-- what toxins you allow in your home.

This recipe is for glass cleaner. It's many uses (faucets, mirrors, windows, etc.) make it an excellent return on investment.  To maximize your savings, I recommend using a microfiber cloth instead of paper towel. It can be re-used (just toss it in the wash) and reduces household trash.

Benefits: Costs less, safer, and environmentally friendly.

Needed

Spray Bottle (I get mine from the Dollar Store)
1 Cup Rubbing Alcohol
1 Cup Water
1 Tablespoon White Vinegar


Steps

Mix all ingredients in spray bottle, give a shake, you're done!


+


+


Here are my bathroom faucet & medicine cabinet before:


Here they are after using the glass cleaner.


Adjust recipe amount proportionally as necessary to fit your needs.


Go green! Save money, reduce trash, and use less chemicals!


~ B


Wine Bags

Wine bags have at least two major benefits: they are a classy, lasting complement to a short-term (especially in our house) gift and they virtually eliminate the chance of you being a victim of police profiling. How? My researcher (husband doing a quick google search while also drinking wine) was unable to find a single instance of anyone ever being "stopped for questioning" while carrying an elegant SDH wine bag. The same cannot be said for the garden-variety brown paper bag.

I read somewhere that not all adults drink wine (this is unconfirmed; please research independently before you repeat this). If this applies to you, making your own wine bag may still be a great idea. They make great wrappers for sparkling cider, flavored oils, or most any bottle you'd like to present as a gift.

Needed
Sewing machine
2 different paterns of fabric 
Freezer paper
Scissors
Ribbon


One of the fabrics will be the bag liner. Since it will fold over the bag, it will be longer in length. The below measurements are for the "normal size" (aka 750 ml bottle). If your girlfriend is having trouble in the love department and it's looking to be a long venting session you may need the "big bottle" (aka however many millimeters are in that wonderful, larger bottle), you will then need to adjust your measurements accordingly.

- Inside fabric (liner): 16 1/2 inches
- Outside fabric: 13 1/2 inches
- Width for both is about 5 1/4 inches

Note: You need TWO pieces of both inside and outside fabric.

~ Use your freezer paper to draw your template on the non-shiny side. To make it a bit easier you can cut around your template, leaving some extra freezer paper around it ~

~ Next place your freezer paper template shiny-side down on your liner fabric. I make sure fabric is folded so I can cut both pieces at the same time. Iron freezer paper to fabric ~


You'll notice I cut out the actual template from the freezer paper, this makes it more difficult later when cutting around the fabric, hence my advice to leave extra freezer paper around your template when ironing to fabric. You will need to use the actual template shape for the second (outer) fabric but at least make it easier on yourself for the first fabric.

~ Once freezer paper is ironed to the fabric, cut fabric, using the template as your guide ~

~ Once fabric is cut to shape of template, peel template off  (save for outer fabric) ~


~ Next iron the template (again, shiny side down) to your outer fabric. Since the template was made longer for the lining fabric, find the 13 1/2 in. mark on the template and cut across ~ 


You now have 4 cut pieces of fabric: 2 liner pieces & 2 outer pieces.

~ Take the outer pieces, right sides facing each other, and sew together. Up one side, around the curved bottom, and up the other side. I tend to stitch, backstitch, and continue stitching at the beginning and end of sewing fabric together, this keeps it strong and less likely to unstitch.


Tip: When you get to the bottom, curvy part of the fabric, you will need to slow down and lift the presser foot a few times to sew with the curve. 


 ~ Follow the same instructions for the liner fabric except leave a 1 1/2 - 2 inch space at the bottom (curved) part of fabric. I mark them with pins so I don't forget to stop (take pins out as you get close, do not try to sew over them, I've heard horror stories of pins flying into eyes). When you stop sewing, back stitch a bit to make it a strong stitch. Same for when you begin sewing again, back stitch then continue stitching to make it strong. You will be pulling the fabric at one point and you want your stitches to hold ~


~ Now you want to take your outside bag fabric, turn it right side out, and put it inside the liner fabric (which is still inside out) ~ 


~ Once the outside bag is placed inside the liner bag, line up both top openings, with seams aligned, and sew around top. My machine has a part that can be taken out to make this step easier, yours may too ~


Your finished top should look like this: 


~ Now pull the outer bag through that 1 1/2 - 2 in. opening we left in the bottom of the liner ~


For some reason, I thought I could keep myself out of this picture. Please do not hold my awkward, unflattering posture against me...


You will now want to stitch the small opening at the bottom of the liner closed. I usually use a ladder stitch to close it but you can use your machine too, nobody will really see this part of the bag. 


~ Now put the lining inside the outer bag and fold over top ~ 


Just insert wine bottle, tie ribbon around the neck, and you're done!


~ B


Saturday, November 3, 2012

Stenciling Shenanigans

Stenciling is an easy way to turn a boring piece of wall or furniture (basically, anything you can paint) into something exciting that adds value to your home. In our example I decided to turn a little-used (and barely noticed) into an eye-catching piece that adorns our front stoop.

Needed:
Tarp (I used an old table cloth)
Stencils
Craft Paint
Foam plate
Paint Sealant
Mini sponges & paint brushes

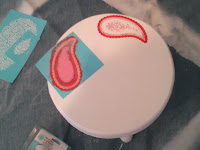
I used Martha Stewart stencils, sponges, & craft paint from Michael's


If you are stenciling on wood, make sure to sand it to make it as smooth as possible before painting.


Once done sanding, I painted my base color, then got my stencil paints ready.


When using sponges in stenciling, be careful not to use too much paint. Once you've added paint to the sponge dab it on your palette a couple times.

Next set up your stencil. There is such a thing as "stencil tape" but my stencil was small and I just used my hand to keep it in place. Later I used painter's tape when I needed it to stay put on a tricky area.

These particular stencils can be moved (carefully) after using, this makes it easy to continue stenciling at a decent pace. I wiped the stencils down with a wet paper towel once I was finished with them.


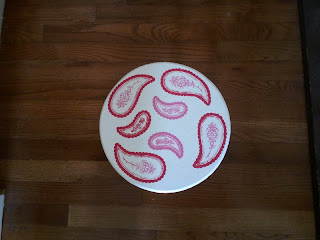
  As you can see I used a stencil around the edges of the stool as well. This was a bit tricky and when the painters tape came in handy.


Because my stool will be outside with the elements, I sprayed it with a paint sealant. You can find this in most hardware stores that sell spray paint.


I'm happy with the results and have noticed many other things that can be stenciled. I may have caught a case of "stenciling fever" and must now use a little self-restraint to avoid going overboard.
                                                ~ B


Monday, October 29, 2012

Make Your Own Laundry Detergent

Making your own laundry detergent is quick and simple, I wish I had started doing this years ago.

Needed:
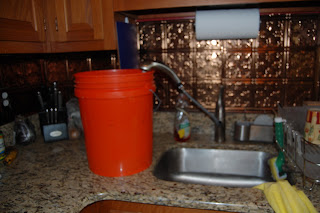
Large bucket (I use a 5 gallon paint bucket)
Cheese grater
1 Cup Washing Soda
1/2 Cup Borax
1 Bar of Soap (any kind will do, I get whatever is on sale)

The washing soda & Borax can be found in your laundry detergent aisle, usually in the bottom shelf area.  Both should last you for an extended time before needing to buy more.


Steps:

 ~ Fill bucket with 3 gallons of water


~ Boil 4 Cups of Water

~ While waiting for the water to boil, grate the bar of soap.


~ Slowly add grated soap to the 4 cups of boiling water (if you add all the grated soap at once it will boil over).

~ Once the soap dissolves, add to the bucket containing the 3 gallons of water.


~ Next add the 1 Cup of washing soda & 1/2 Cup of Borax.


~ Finally, mix around around a little, cover with lid, and let sit for 48 hours before using. If you are in a bind and need detergent sooner, you can use it after 24 hours. It will be a bit "gloopy" but just as effective.

~ Use 1 Cup per load. Should yield about 52 loads ~


 Regardless of its consistency (liquid or gloopy), it will break down while washing and clean your clothes just fine. I have not bought laundry detergent in almost 3 years.

~ B

Wednesday, October 17, 2012

The Case of the Boring Bookshelf

We have a ton of books in our house and tend to pile them into random bookcases in various rooms. One such bookcase we picked up somewhere for very little money and put in the corner of our family room.  I love the placement in the corner (credit goes to my clever husband, he can walk into any room and see exactly where the furniture should go) but felt it needed some organization and a little something to make it look a little less cheap.

   
Recently I've become slightly obsessed with designs with lattice in them. I found some contact paper on ebay and decided to apply it to the bookcase in an effort to make it look a little bit nicer and organized.

It only took a little bit of measuring and careful applying and I'm happy with the results. 


The beauty of this project is you can use whatever design you want. Contact paper, self-adhesive wallpaper and even craft card stock will work.
~ B

Thursday, October 4, 2012

Before & After


Now that we own a home I find myself glued to HGTV hoping to pick up design tips. I'm always blown away by designers who can find accessories to "pull a room together" and do small things that completely change a room's style. Sadly, I do not possess that natural talent and have to keep myself from being too "matchy matchy" (i.e. buying pillows that perfectly match the wall color, using furniture sets instead of breaking them up, etc). Just look at my original living room above. I decided to put my sewing skills to use and make a few pillows using different colors I wasn't entirely comfortable with (Think of the Seinfeld episode when George decides to do the exact opposite of what he would normally do in order to better his life).

16 x16 Orange/Yellow Pillow
12 x 16 Lime Pillow
14 x 14 Raspberry (felt) Pillow
While looking online I found that curtain tie backs could range from $12 - $40. To me this is ridiculously expensive. I decided to use my leftover raspberry felt to make my own. Using just my pinking rotary cutter and some self-adhesive velcro it was pretty easy.  

Probably the most complicated project was the mirror. This mirror actually came with the house and was far too big for the master bathroom. We had enough mirrors for the other rooms but I hated the idea of just tossing it since mirrors can be pretty expensive. I decided it would fit perfectly between the two windows (where the red berry wreath was) and decided to paint the gold frame white. I have never stenciled before but decided I would give it a shot after seeing this great blog entry. It's a lot easier than I expected and now I fear I will be stenciling everything in site. The mirror became exactly what I wanted it to be: functional and decorative.


All in all, the craftiness paid off and I'm happy with our updated living room. 
~ B